The House Building Process Step By Step – A Guide For Beginners
Building a house is not an easy thing to do. Just ask me, I’ve spent the last 9 months planning, and building a new house and I can tell you that even with the best builder you are going to face issues and problems.
So after you decide to build your house, you should be aware of these problems before you hire a moving company too.
However, in this article, I’m going to cover the house-building process step by step and go over what it took me to build my house.
Now I’m going to warn you this is a fairly lengthy article so pull up a seat grab a cup of coffee and start reading.
Previous Articles
Also before you dive you may also want to read the other articles in the series that I’ve covered over the last few weeks as well to give you a base of where I’m coming from. You can check those out below.
- 8 Unexpected Costs Of Building A New House
- 10 Tips On How To Sell Your House Fast And Get Top Dollar For It
The Pre-Planning Process
To start, I’ve broken the entire building process down into three main areas, preplanning, the building process, and the post-building process. From there I broke things down into smaller subsections to make this article easier to read.
On top, the order of every step along the way can vary from builder to builder, and your builder may have a different way of doing things. So with that said let’s get started.
1. Meet With Your Builder
When we first got started with the building process we chose a builder that met several different qualities. A few of them are a high-quality record, quality craftsmanship, speed, and most of all ability to adhere to the price we had set. If you’re still looking for a builder then check out these pa custom home builders.
We also looked into what kind of software these contractors were using, if they used something like the Procore iPhone construction app then that was considered a plus as they can share things with us like floor plans and checklists instantly.
Now we obviously had to meet with our builder several times before we even were able to finalize our plans and this took a few months in itself to do. In fact, one, in particular, lasted over 3 hours and we went through every last detail of the house. We discussed everything from average sized house for family to various floor plans.
These meetings can get quite long but it was all worth it in the end. Now one thing I should mention if you still have not decided on a set of house plans you can check out The House Plan Shop which has tons of great ideas to help you get started.
2. Survey The Lot
Before you can buy your lot it needs to be surveyed.
In most cases, if you are building in town the lot will likely already have this done, but if you’re building out in the country this may need to be done yet.
3. Meet With Your Lender
Next, once you’ve met with the builder and gotten the pricing nailed down you will need to meet with your lender. In order for your builder to even put you on their dig list you will need a few things.
One of them is a letter from your lender saying you are pre-approved for the construction loan. Typically lenders would like you to be able to put 20% of the total cost of the home; however, when you’re building a $200,000 this isn’t always possible.
So if at the very least you should be able to put 10% down.
4. Meet With The Electric Company
Another meeting you will have to have is with the electricity company. Now every company does this differently. For example, all I had to do was meet with my electric company and go over what I was going to have for electricity and what I was not.
This was a fairly simple meeting and took about 30 minutes, However, some companies will require a site map and other documentation before they even come out.
5. Sign Up With the Gas Company
You will also have to sign up with your natural gas company as well unless you plan to go with some other alternative heating method such as propane, electric, or even a wood-burning stove.
One thing I personally suggest is if you do plan to use natural gas sign up early. Typically these companies will have to come out before they can even send you an application and inspect the lot.
On top of that, it took three months and a ton of phone calls to get them to come out and install the gas line from the street to my house.
6. Buy Your Lot
Once you’ve been approved for your construction loan it’s time to buy the lot.
You can go several different ways about doing this from putting a down payment on the lot and having the bank cover the rest of the money or in my case the bank covered the entire cost of the lot upfront and once we closed on our construction loan we paid our down payment.
7. Get Your Permits
Once you’ve got your lot bought and you’ve completed your final meetings with your builder you will need to get your permits to build your house. Permits can vary from one place to another, such as a building permit, driveway permit, and who knows what else.
In my case, all I had was a $10 building permit and that was it. On top of that, the town needed a copy of my house plans, and a site map to show where the house would be placed on the map and reviewed by a board for approval.
In that meeting, the board will review the plans and make sure it meets the requirements of the lot. For example, on my lot, I’m not allowed to have any buildings built behind the house, and I can’t build within 10 feet of the property line on either side of the house.
8. Builders Insurance
Once you start to get near your dig date you will have to acquire your builder’s risk insurance.
This is basic insurance coverage that will protect you in the event something is stolen off of your property while the house is being built, and if any of the workers happen to get injured in the process.
9. Set Your House Corner Pins
Finally, one of the last things you will have to do is set corner pins for your house. Now as I said every company does this differently. My builder required me to have these set before the day of the dig.
In my case, I got someone to help me and had someone from the town inspect it before we started. With other companies, they may have the excavating crew do it, but it all depends on who does it.
The House Building Process Step By Step
Well there you go, I’m already 1000 words into this article and we’ve finally made it through the preplanning stuff. To be quite honest the preplanning stuff can take just as long, if not longer than the building process itself.
In fact, we started planning our house in June and we didn’t start digging until November last year. However once a bulk of the big decisions have been made it starts to get a lot easier from there.
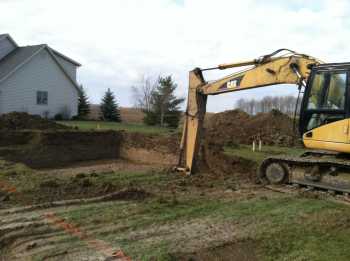 1. Dig Day
With all the pre-planning stuff out of the way, it’s time to begin the building process, and that all starts with the dig day.
The dig day is the official start of building your house and can be exciting and nerve-racking all at the same time. It’s on this day that they start digging your basement, and any other things such as your construction driveway.
I actually took this entire day off and even took my kids out to the construction site to see them dig the basement.
2. Pour The Footer
The next thing that will happen is they will pour the footer. A footer is a base that supports the entire foundation. This part only took a day to get done but it had to sit for a week to cure.
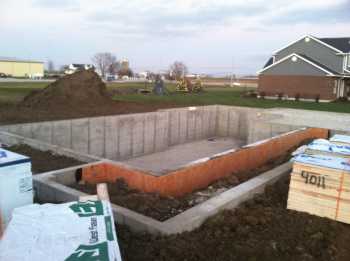
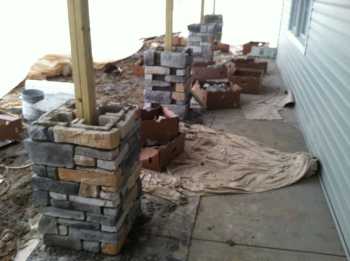
3. Pour Basement Walls And Floor
Once the footer has cured it’s time to pour the basement walls. The great thing about our builder was the fact that they poured 10” walls.
That’s a little bigger than most basement walls and it helps against cracking or letting any water in. On top of that, a 1” thick foam board was placed all the way around the outside wall to give extra added protection.
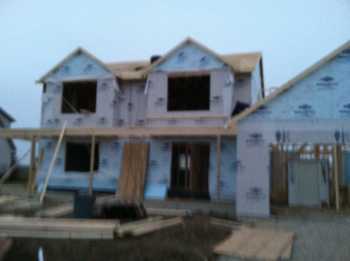 4. Frame The House
Once the foundation had been set for a week or so, the framers moved in and started constructing the house.
This process actually moved very fast, in fact, our builders had it fully erected in 3 and a half days. On top of that, the process went fast because there wasn’t just one crew working on the house at a time but rather multiple crews.
When one crew would get done the other crew would move in just as fast to complete the next task.
5. Install the Windows, Roof, Siding, and Exterior Doors
Once the framers have finished the roofers moved in to lay the roof, install the windows, and put up the siding, a good company to choose is Chase Construction North West for your roofing needs.
With our house, we went with a lifetime shingle, and Pella windows, on top of that we are able to wash all the windows inside the house, which is one thing my wife defiantly wanted to have.
6. Do A Walk Through With The Electrician
At this point, the house should be nearly enclosed and ready to do a walk-through with the electrician. It’s at this point where you can add any extra outlets, switches, or lights.
In my case, I added extra can lights on the porch, and a few extra outlets in the garage, and basement. On top of that, we also had 4 Cat 6 lines running around the house for our internet and cable and one phone jack.
I should also mention this step is a very important one because it’s a lot easier to install these things now before they insulate and hang the drywall. So plan your outlets, switches, and lights carefully.
7. Install The Plumbing
At the same time, the plumber may be installing a lot of your water and sewer lines and maybe even a few fixtures such as showers.
It’s also good to touch base with your plumber in case you want to add something as well.
8. Install Furnace, and AC Unit
Another thing that will be done around this time is the furnace, and AC unit will be installed as well. Along with that, all the ductwork will be installed it.
9. Insulate
Once all the electrical lines, plumbing, and ductwork have been installed it’s time to insulate the walls.
One extra thing I also had done was I insulated the walls in my garage as well, this way I could heat it if I wanted to in the winter time of the year, giving me a place to work on stuff.
10. Hang The Drywall and Mud
Next, once the insulation is in it’s time to hang the drywall, mud it, and sand it. Now I have to give a lot of credit to the guys who hung my drywall because they had it hung in 2 days and they were coming from 3 hours away to do it.
After the drywall was hung another crew came to mud and sand the walls. This process took over a week to do and it also required heating the house up to around 90 degrees to dry the house out as much as possible.
This was only done because I was building in the winter and we needed warm up the walls to draw the moisture out.
11. Paint
The next phase of the home-building process was to paint the walls.
Now I could have opted to paint my own walls but their painter got it done in 4 days and had an airbrush which sped up the process a lot versus using rollers and paintbrushes.
On top of that for a few hundred dollars more I had him paint the walls in the garage and the walls leading down into the basement.
12. Hook Up Permanent Gas And Electric
Right around the same time, your painting is getting done your permanent gas and electric should be hooked up because it is very crucial for the next step.
13. Lay The Flooring
In order to lay the flooring the sub-flooring must be fairly dry. This also depends on the time of year you are building your house as well. If you are in a time of year when things are dryer it won’t take nearly as much to get it done.
This is why I suggest building in the summertime if possible because I ended up with an extra $1000 propane bill for temporary heating until my natural gas and the electric line were installed.
 14. Install Cabinets and Trim Work.
Once the flooring is in, it’s time to install the cabinets and trim work throughout the house.
This is where your house really starts to become a home. This is also the time when the final electrical and plumbing fixtures will be installed as well.
15. Install Appliances
It’s also at this point that appliances can be brought in and installed. Now some people won’t do this until after the house is completely built but I decided to do it before it was fully complete that way if I wanted to make any last-minute changes I would still be able to make them.
For example, I noticed when I installed my washer and dryer that they had a four-prong outlet installed instead of a three-prong outlet and it allowed me to have them change it out before they were finished.
16. Send In The Cleaners
One of the great things I liked about my builder was the fact that once everything was done they even had a group of cleaners come in and wash all the cabinets down, sweep the floors, and even clean the windows.
On top of the painters even came back one more time to touch up any spots that may have gotten nicked when moving appliances or carpet in.
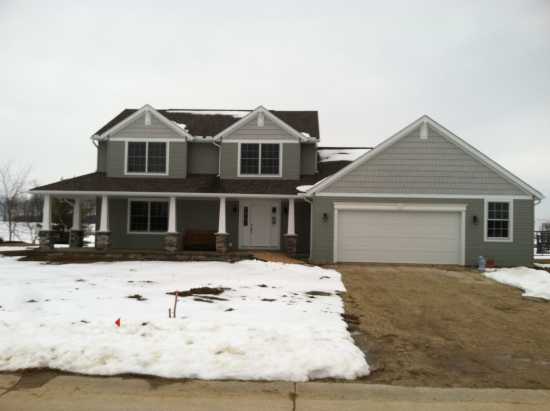
17. The Closing
Finally, once everything was done it was time to close on the house. I have to admit the building process went fast. We started on November 20th of 2012 and were finished by February 20th, 2013.
Three short months and the entire house was finished, I know houses in my area that started before us and still are not done, so we were doing really good.
The Post Building Process
If you’ve made it this far in the article you know just how much work is involved to build. However, at this point, it’s all downhill from here, and there are only a few more things to do before everything should be finished.
1. Before You Move In
Before you move in there are a few things to be done that will defiantly help out.
First, one thing I did before I moved in is I hung a lot of the blinds, and wall decorations. With none of the clutter in the way, this is the best time to install these things.
Secondly, you may want to consider putting down some plastic or cardboard to help keep your floors clean so that when people are moving stuff in you don’t get mud on your carpet or scratches on your brand-new floor.
2. Moving Day
Finally, the big day is here. From this day forth you will be living under the roof of your new house.
This day can be exciting and overwhelming all in one day, this is why I suggest you break it up into two days if possible and get a few family members to help you out as well.
For example, I took Friday off of work and got my brother to help move some of the smaller stuff, and on Saturday I was able to get more people to help me move the bigger items.
On top of that, I also had people help out by preparing meals ahead of time so we didn’t have to do that either.
3. Install Cable TV, Phone, and the Internet
Once you’ve moved in you can install your cable TV, Phone, and internet.
One thing I should mention here is that since your house is new you may have an extra cable charge or installation fee for running a line from the road to your house.
4. Close On The Mortgage
Now that you’ve moved in and taken care of the final bills it’s time to close on your mortgage.
At the time of this writing, I still have yet to do this but plan to shortly. The good news is I’m going to get a fairly decent interest rate of around 3.5% which will save me a ton on interest over the long term.
5. DriveWay
Now that the home process is winding down one of the few final things to take care of is pouring the driveway and sidewalks.
However, I plan to wait until June to do this because I want the ground to settle a bit more so I can avoid any cracks in my concrete.
6. Plant Grass, Trees, and Shrubs
Finally, one of the last things to be done is to plant grass, trees, and shrubs. The great part about this is my father-in-law does shrub work so he will be able to help me with that.
I plan to plant a maple in my front yard for a shade tree and go with boxwood’s hastes, and some small spruces for the shrub beds.
As for the grass I plan to do it myself but it won’t get done until the fall otherwise I’ll be watering it all summer and that could result in a pretty tall water bill. So I figured it’d be much simpler for Mother Nature to do most of the work and wait till the fall.
My Final Thoughts…
Well, there you have it, the house-building process step by step. I’ve covered a lot of stuff and I could have gotten into a lot more detail but it would’ve ended up being a 10,000-word article before I got done.
In the end, I’m glad things are winding down, I’m glad I only have to do this process once because I don’t know if I could do it again.
So is there anything you would add or change?


Very helpful post Chris! Congrats on getting it all done and I am sure it feels great to be in it now. We’re definitely looking at this as a possibility in the future once our kids get older. The house looks great btw! 🙂
Thanks John. It’s great to be moved in. I still have a few boxes here and there to take care of but that’s about it. One of the things I wanted to convey in that article was the fact that their is a lot of stuff to do, a ton of decisions to be made, and a lot of time to get things done. Thanks for the comment John.
Love this post! Extremely helpful since we are thinking about having our next house built.
Thanks Michelle. I only wish I had all this info when I was first building my new house. Their are a lot of things builders sometimes don’t disclose or leave to you to figure out. One for me was the garage door opener and remotes. I thought all of that was included but they only ran the wiring and that was it. It was up to me to have someone else install one, which wasn’t a big deal I just wish they would have been more upfront and told me about it. Thanks for your comment.
So much to think about! what helped us most is to project ourselves living in the house. Where would the furniture go, where would we plug things… can we move stuff around? because once the electric wiring and plumbing are laid it is much harder to change.
I agree with you their Pauline. I think my wife rearrange the furniture three times before you found something she liked. However for the most part we got everything pretty much where we want them. Thanks for the comment Pauline.
Very in depth Chris. I need to point this post out to my brother who is about to get started with construction. He may find it useful.
Very nice! We are going through this right now so it is interesting to see the whole process written down. One piece of advice I would give to those going through the process is to double-check everything the builder does. We have a very experienced and reputable builder and they just screwed up our framing by using 2x4s instead of the 2x6s we paid for!
Thanks Grayson. Thanks for sharing the article, I hope it helps your brother out. Building a house is not an easy thing to do no matter who you have as your builder.
Great point Nick. Just because you builder says they are going to do it doesn’t mean things always turn out the way you want. In your case with the mix up on using 2X4s instead of 2X6s I’d either have them redo it at their cost or have them lower the final cost of the house. Whatever you do don’t let them off the hook.
This is why I liked the builder I had. Anytime I had a problem they fixed it no questions asked. This makes for a much better building experience.
Your home is beautiful! We bought our current (and first) home looking to do renovations. Which we did but won’t do it again. We’ll stay here another 5 or so years and move into our forever home which we will likely build. This is really informative since I didn’t know all the differences between building and a traditional sale. Thanks for sharing.
Nice post! I have toyed with the idea of building a home, but it’s just not realistic in Vancouver with prices being so high. Plus, I don’t really need a house, haha. It’s nice to see what the whole process entails though – especially with regard to the financing.
Thanks Catherine. I’ve also done a home renovation as well and had to move out for an entire month and move in with my parents. What made it even worse was the fact that my wife and I just had our first baby at the time and it was really stressful. As far as building a house it’s definitely something you don’t want to rush into to you have enough money saved up. This is one thing I wish we were able to do more before we built. Thanks for commenting.
Yeah the cost to build a home plus the cost of land can’t be cheap when you live near the city CF. I have a friend that lives in Seattle and he was telling me that a home out there can go for 3 to 4 times as much as it does in Ohio. Kind of crazy when you think about it. Thanks for the support CF.
That’s a beautiful house! This post certainly brings back some memories. I don’t think I could ever build one again. I hope we stay put for a long, long time.
I agree Kim now that I’ve gone through the process I don’t think I could bare doing it again. It’s way to stressful for me.
Chris, I love the thoroughness of this article! Also, I love the idea about hanging the window coverings and the decorations before you move in: smart!!
Thanks Laurie, it’s way easier to do all that stuff before hand. However I wasn’t able to hang all the pictures because my wife wasn’t sure where she was going to put the furniture first, so their is some stuff that will have to wait until after, but as for the blinds and other window treatments that can all be done before you move in so you’re not stepping on top of all your furniture.